Alien 560 Quadcopter Build - Part 3 - Transmitter setup
I wish I could tell you that setting up the transmitter was straightforward, but unfortunately, it wasn’t. I’ll do my best to describe what I did, although I’m not sure my process is 100% repeatable.
I have a Turnigy 9XR Pro transmitter with a FrSky JR module. It is a digital radio with lots of features: updateable firmware, model memory, custom sound files and so on.
The first thing I did was upgrading the firmware. That process is a bit different depending on whether you have a PC or Mac. Effectively it involves connecting the transmitter to the PC with a USB cable, firing up eepskye application, setting a few parameters and flashing a new firmware via the app. I found a useful cheatsheet for updating Turnigy 9XR firmware at Quadcopter Basics website. It is also worth to consult the official Turnigy 9XR Pro: Using the Eepskye Program manual.
All subsequent setup is performed on the transmitter itself via the series of the menus. Unfortunately, the structure of those menus changes depending on the firmware version. My version after the upgrade was V.3527-Mike. There’s a 9xr tutorials RCGroups forum thread to help you with the initial setup, besides John G provided a useful Turnigy 9XR APM Arducopter/Arduplane radio settings cheatsheet. Also don’t neglect to check the official 9XR Pro: First Steps with Ersky9x manual, but keep in mind that those may be outdated.
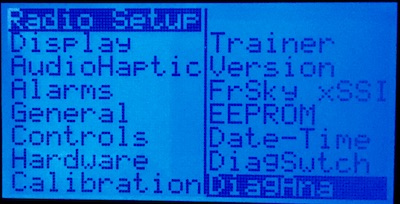
A long press on the left side 4-position switch gets you to the main menu.
-
Go into Controls to change the channel order. Pixhawk requires the channels to be in AETR order: Aileron, Elevator, Throttle, Rudder. However, although that is a correct order for Mode 2 radio I have, the order may be different for Mode 1.
-
In Calibration section calibrate the radio’s controls.
-
Set current date and time in Date-Time section.
-
Exit returns you to the main screen.
A long press on the right side 4-position switch gets you to the main menu. Here you need to create a new entry for your model.
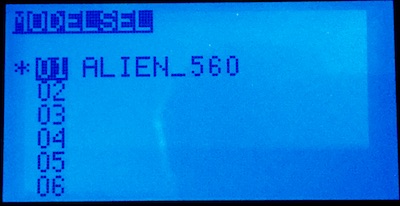
Once you create a new model name, there are a few settings which need to be set up for it.
First of all, Enter Protocol section to set up your module and receiver options:
- In my case, the protocol needs to be set to PXX which FrSky uses.
- RxNum is 1 which is the number of the paired receiver in that model.
- Type is D16 - the receiver is configured for 16 channels (check your receiver manual, for FrSky X8R I use it is a default configuration with no jumpers shortened.
- Finally, pressing Bind puts the transmitter module into bind mode. Follow your receiver manual to bind the transmitter to the receiver. For X8R it involves just pressing a Bind button on the receiver once the transmitter is in bind mode.
Setting up flight modes
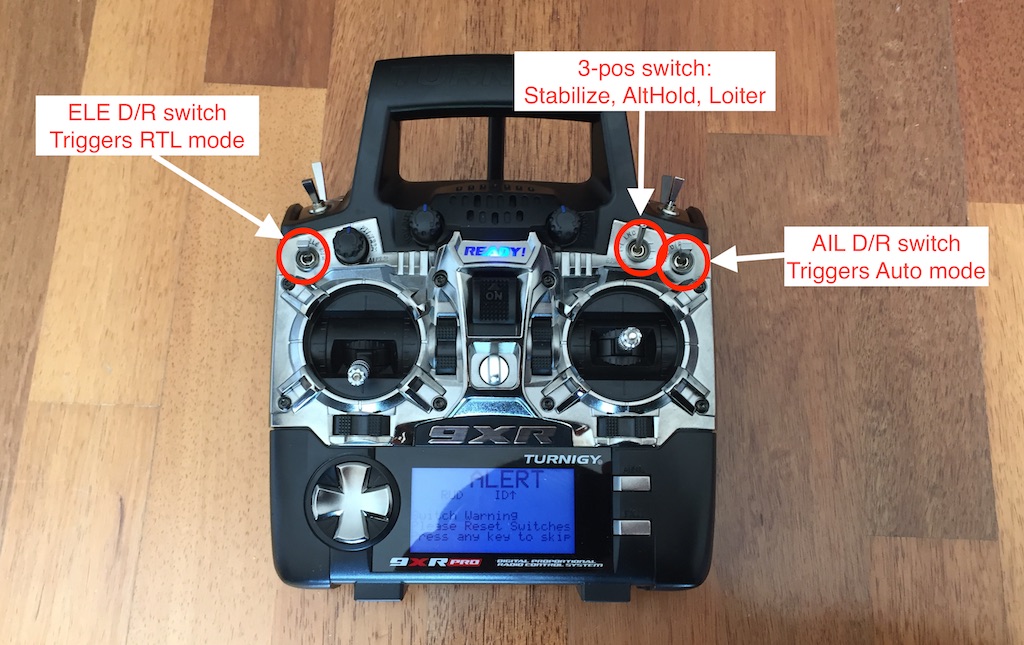
Pixhawk has quite a few flight modes. If you want to switch flight modes in-flight, a radio transmitter usually has a 3-way switch you can use (some radios have a 6-way switch). Turnigy 9XR has a 3-way switch, but I wanted to do something more advanced than just being able to choose between 3 modes. I got an idea from Mike Perillo’s blog post. My setup allows me to switch between 5 modes in the following way:
- ELE D/R switch on the left is mapped to RTL (Return-to-Launch) mode. If it is turned on, it overrides all the other mode settings. It is an emergency feature aimed to return the aircraft to the launch site with a single switch flip.
- AIL D/R switch on the right is mapped to Auto mode and overrides other mode settings except for RTL switch.
- The 3-way switch is mapped to Stabilize, Alt Hold, and Loiter, but only if RTL or Auto are not enabled.
The way I did that was with the combination of logical switches and mixer configuration. An important thing to understand is that the flight channels are mapped to the values on Channel 5 according to the configuration you define in Mission Planner or QGroundCtrl (more on that later). So all you need to do is to map different flight modes to values evenly spread across -100 … +100 range on channel 5. That involves a few steps:
Enter Model Setup → L.Switches menu. Logical switches can have On and Off values just like real switches, but they are defined by logical formulas rather than positions of the handles on the transmitter. Set up logical switches like this:
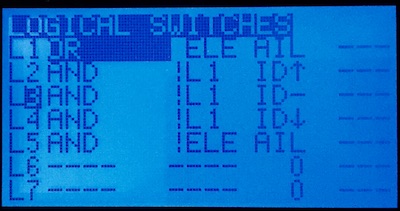
This effectively corresponds to the following formulas:
-
L1 = ELE OR AIL. Logical switch L1 is enabled if either ELE D/R or AIL D/R switch is on. In other words, if L1 is off when neither RTL nor Auto mode is engaged. -
L2 = (NOT L1) AND ID-UP,L3 = (NOT L1) AND ID-CENTRE,L3 = (NOT L1) AND ID-DOWN. That means that L2 - L4 switches will only take effect if L1 is off, i.e. when neither RTL nor Auto mode is engaged. Logical switches L2 - L4 will be responsible for Stabilize, Alt Hold, and Loiter modes respectively depending on the position of the 3-wat switch (up, centre, or down). -
L5 = (NOT ELE) AND AIL. Logical switch L5 is responsible for Auto mode and will only be enabled when ELE D/R switch is off and AIL D/R switch is on.
Next set up flight modes in Modes menu.
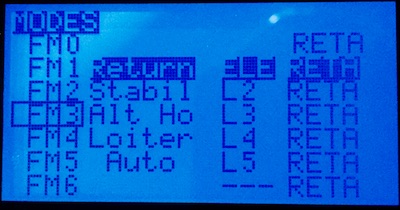
You can see that Flight Mode 1 - Return is triggered by ELE D/R switch, while 4 other modes: Stabil, Alt Ho(ld), Loiter, and Auto are triggered by logical switches L2 to L5 respectively.
And finally, enter Mixer menu. These are probably the most complex settings in the entire transmitter, and I’m going to cover just enough of it to set up the flight modes the way we want.
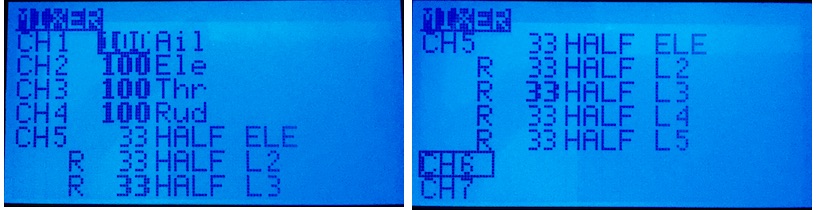
You can see that channels 1 to 4 are mapped 100% to Aileron, Elevator, Throttle, Rudder (remember I told you about AERT channel order?), while channel 5 is different. It is configured to trigger the discrete values depending on the values of the switches we have previously set up. All the CH5 submixes are identical except for Offset and Switch values.
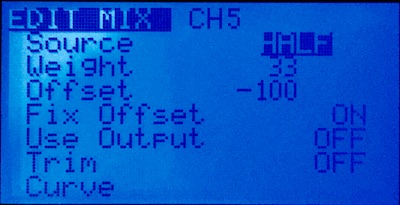
- 1st: has Weight: 33, Offset: -100, and Switch: ELE
- 2nd: Weight: 33, Offset: -77, and Switch: L2
- 3rd: Weight: 33, Offset: -50, and Switch: L3
- 4th: Weight: 33, Offset: -20, and Switch: L4
- 5rd: Weight: 33, Offset: 27, and Switch: L5
Submixes 2-5 have Replace multiplier. The above setup means that switches ELE, L2, L3, L4 and L5 are mapped to values -100, -77, -50, -20, 27 on channel 5 axis, which works nicely to switch between the first 5 channels configured in the ground station software (I’ll cover that later). I chose those values empirically by tweaking them until that worked.
That concludes the transmitter setup. Next, to the Pixhawk software setup and configuration.
To be continued…