I work at Odecee. It is a technology consultancy company with a difference. They understand that people are their main and only asset, so they tend to hire smart IT professionals, pay them well, and give them cool toys.
Every week they run brown bags in their office. A “brown bag” means a lunchtime presentation where attendants are supposed to bring their lunches (in brown paper bags, hence “brown bag”). Yet, Odecee also provides catering for those events.
We have monthly sessions on web development, DevOps, mobile development, and “kitchen sink” (tech topics which don’t fit into any other category). However, employees are invited to speak on any other topics they are passionate about, whatever drives them, makes them tick.
I myself recently took an opportunity to present a brown bag on the basics of iOS music production. The reason I wanted to talk about music to a technical audience is because engineers often see the world through a lens of their technical skills. They like no one can benefit from a creative freedom music gives them. For engineers music, especially electronic music, is a perfect creative media. It is technical but, at the same time, it is unstructured. It obeys laws of physics but musicians don’t need to rely on formulas to create.
I hold a view that everyone can be a musician. Making music should be fun, the tools should be easily available and easy to use. Unfortunately, it is often perceived as something highly complex and expensive, only accessible to a few chosen ones. That point of view is reinforced by a current state of desktop music production tools. But fortunately for us, Apple delivered yet another mobile revolution and this one passed mostly unnoticed by the general public - the revolution in mobile music production. As with many other areas, iPhones and iPads made music making what it should be - easy, fun and accessible.
My goal with this presentation is, quite simply, change the world, one man at a time: if after that even one person picked up a music instrument, whether a real one or one in an iOS app, and made a tune then my job here is done.
This isn’t a new song. I wrote it 3 years ago as an assignment for Berklee’s Online Composing and Producing Electronic Music course.
It is heavily influenced by Robert Miles, one of my favourite trance artists. Here it is, “Dreamer”:
This tutorial explains how to record the output of one MIDI track (for example, arpeggiator’s output) into another MIDI track.
Although FL Studio allow internal MIDI routing, it is not possible to record MIDI information which is being internally routed from one MIDI track into another. I.e. you can have an arpeggiator in one MIDI track transmitting notes into another track, where a synth would play it, but you won’t be able to record the notes arppegiator transmits. Fortunately, there is a workaround that allows us to do just that.
For that you need to download and install Tobias Erichsen’s loopMIDI device.
Once installed, click on loopMIDI icon in the system tray to bring up its window. Click “+” to create a MIDI device.
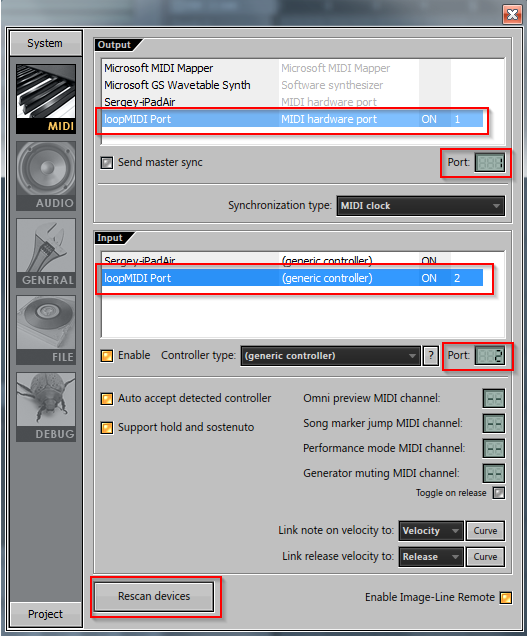
Open FL Studio, go to Options → MIDI Setting
Find the loopMIDI you created both in “Input” and “Output” sections. Set the loopMIDI Input MIDI port to 1, and Output to 2. (You may choose other port numbers, just make sure that output port is different from input).
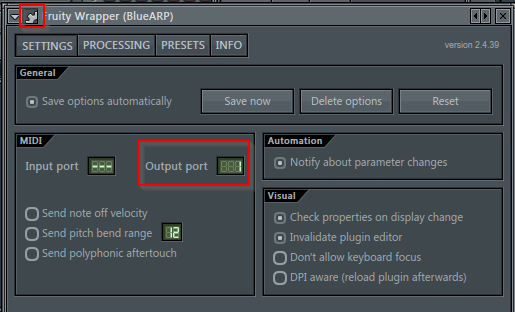
Insert an instrument you want to transmit the MIDI data from into one instrument channel, and a receiving instrument into another channel. In my example I use BlueArp arppegiator into a track containing Synth1 synthesizer. BluArp itself requires a MIDI input, so I drew a simple 3-note pattern in the piano roll of its instrument channel.
Now we neet to set up the MIDI routing.
Open BlueArp and set its MIDI Output Port to 1 (the number we used for our Output loopMIDI port). Click on the “Gear” icon to open BlueArp’s Fruity Wrapper and set Output Port also to 1.
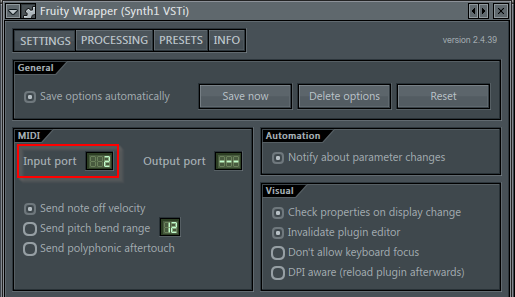
Now open the Synth 1’s Fruity Wrapper and set its MIDI Input Port to 2 (the number we used for our Input loopMIDI port).
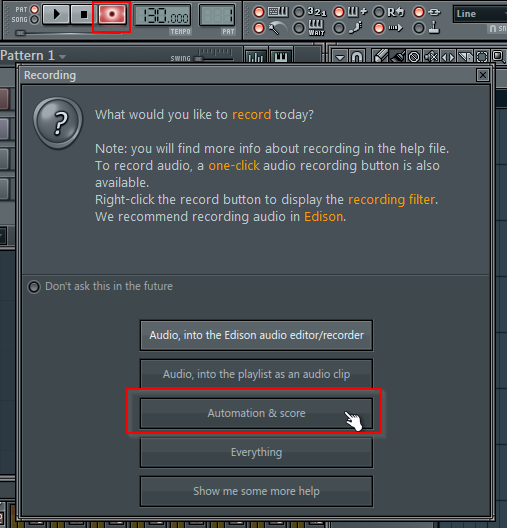
That’s all the setup you need to do.
Now press “Record” button and arm recording of Automation & Score.
Press Play to kick of the recording, and you should see the output of the arpeggiator recording into the Synth1’s piano roll.
Some time ago I wrote
my thoughts on the modern state of PC music-making applications.
In the nutshell, I reckon that niche became too overpriced and
overcomplicated. All the existing digital audio workstations are
targeted towards professional users, with the price tags to match. At
the same time, the area of casual music production remains a no-man’s
land.
Since then I got an iPad and discovered that simple and cheap music apps
which I missed so much are plentiful there. I am excited about the
emerging phenomenon of music production on iOS. There are already
all-in-one DAWs for iOS such as
NanoStudio and
BeatMaker2, and even
multitrack recording DAWs such as
Auria. Moreover, while virtual
synths for PCs & Macs cost circa $100 or more on average, synths of
comparable quality for iOS are about 5 times cheaper. If you doubt, take
a look at AniMoog,
WaveGenerator, or
nLogSynth.
Since its appearance the iOS music scene is expanding rapidly. Large
companies start to realize that iPad is not just a toy, and the recent
inflow of software from Korg,
Moog,
Akai, and the most recent,
Steinberg
and
Yamaha
is the proof of that.
Indeed, I reckon we are witnessing a rise of a new music making
platform. The platform which is simple and accessible enough for
beginners yet has a potential to become powerful enough for
professionals.