How I fixed kernel_task consuming 100% of my MacBook’s CPU
Recently I started experiencing a weird issue with my 2016 MacBook Pro.
I occasionally play Velocidrone FPV racing simulator on it. So far it worked fine. Although MacBook Pro doesn’t have enough power to run it in 4K resolution, it works reasonably well in 1280x1024.
However, this time it was a different story.
Once I started the game, the CPU went to 100% and the frame rate dropped from above 40FPS to one frame per few seconds. That lasted for about 30 seconds. Then everything sped back up, only to go back down in another 20 seconds. And so on.
When I looked at the CPU load chart it looked like this:
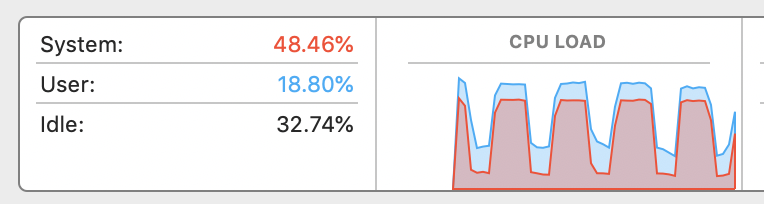
The CPU was consumed by “kernel_task” whatever that was
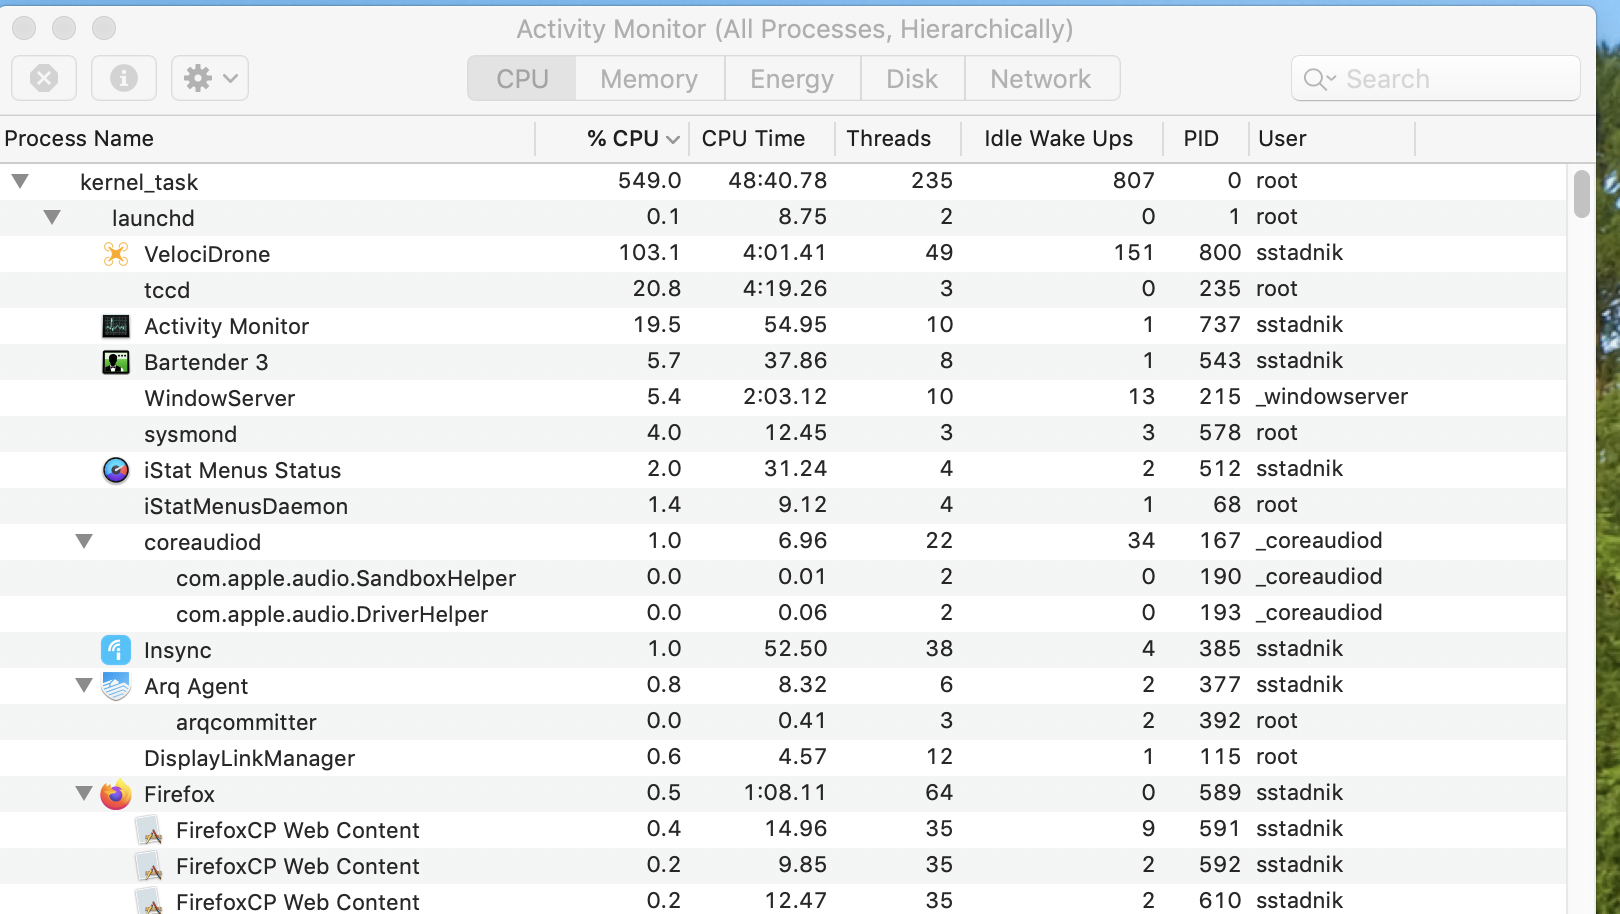
And this is what it looked like when it came back to normal:
No matter how much I tried, I wasn’t able to find a reason for that behaviour.
What was that mysterious “kernel task”? The search on the internet didn’t bring clarity. One thing was clear - something was hogging my CPU.
I asked around. One of my friends suggested that the slowdown was caused by a heavy memory or I/O activity. However, I couldn’t find any correlation with any of the above.
Over the next few days I tried a few different things to fix that:
- I checked my SSD for filesystem errors, found a few and had them repaired. I thought that could fix the slowdown. Nope.
- Upgraded to macOS Catalina hoping that would make the problem go away. It didn’t.
- I reset the SMC and NVRAM. Didn’t help.
- I even tried to install Windows under Bootcamp on my MacBook pro. I was hoping that the performance problems I was having won’t happen under Windows. I was wrong :-( I had exactly the same CPU throttling problem when I tried to play Velocidrone on Windows under Bootcamp.
I ran out of ideas and went back to research.
The problem was not isolated to playing 3D games. Anything that required even a moderate load from the GPU led to my laptop becoming comatose. To be precise, the load to the discrete GPU. My MacBook Pro 2016 has 2 built-in graphic chips:
- Intel HD 530 which is used for applications not requiring complex 3D graphics
- Radeon Pro 455 which kicks in when a powerful 3D graphics unit is required.
In my case, everything was fine while the Intel GPU was in charge. But the Radeon was causing problems.
I would be happy with Intel graphics. I didn’t play demanding 3D games on that laptop. And Velocidrone worked fine on Intel. However, I had no control over it. In the past, there was a way to tell macOS which GPU it should use. gfxCardStatus could do that. However, no more. Apple in their wisdom took it away. These days applications can demand a switch to desecrate graphics and there’s nothing you user can do about that.
After some time I found that I am was dealing with a known problem. It has been described before by Kris Wouk. There may be a variety of reasons for that. In my case, most likely, it is due to misbehaving thermal management.
Once CPU load goes up and CPU heats up beyond a dangerous level, the system thinks that the CPU is overheating. Then it curbs the CPU usage to cool the system down. It does that by taking CPU cycles away from the process which uses a lot of it and giving them to “kernel tasks” process which effectively does nothing.
Strictly speaking, “kernel tasks” is not a process (although Apple themselves call it a “process”). It is macOS itself, its kernel. When a system overheats, macOS takes CPU cycles upon itself by creating a bogus load manifesting itself as a CPU-heavy “kernel task” process.
I was dealing with a textbook example of thermal throttling.
That makes perfect sense. However, in my case, the CPU wasn’t overheating. My MacBook was just slightly warm and the CPU fans barely kicked in.
Despite being a known problem, it appeared that nobody knew how to fix that for sure.
One of the suggested fixes which worked for some people involved deleting the SMC prop file. To me, that sounded pretty extreme. That effectively disables the thermal management. While it may help the CPU throttling, nothing would stop CPU from overheating and eventually breaking down.
I thought about taking the laptop to Apple. They would most likely tell me that the logic board requires replacement. Since the laptop wasn’t new, the cost of that would likely be more expensive than the MacBook itself.
One solution I could see was getting an external GPU. Since my MacBook Pro had a Thunderbolt 3 ports, I could use one of them to plug in an external GPU enclosure such as Razer Core. That would off-load my built-in discrete graphics chip. And, as a bonus, that would give me desktop-class performance. If I wanted, I could play demanding 3D games.
I started researching external video cards. They looked tempting. But I finally decided against getting one after reading this article on Business Insider. I came to the conclusion that I didn’t want my desk space occupied by a large box. Besides, the enclosure itself is expensive. By itself, without a video card, it is more than $500 AUD. That cost doesn’t contribute to anything. Then I’d need to spend at least a few hundred dollars on the video card. And then there was a problem with compatibility. macOS does not support NVidia video cards, so my choice would be limited to AMD. However, not every AMD Radeon is supported too. I potentially could buy an unsupported video card and be stuck with it.
Besides, it wasn’t guaranteed that an external video card would solve my problems after all.
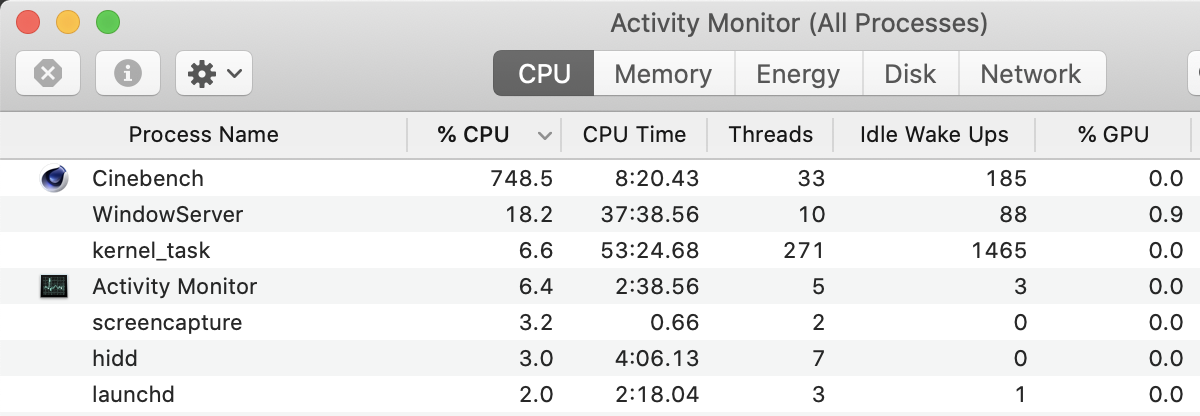
I wanted to see how my MacBook behaves under heavy load. I downloaded Cinebench. It puts a huge strain on the CPU by rendering a static 3D scene via ray tracing. Once I started the test, all of my CPU cores were instantly loaded to 100% and the CPU temperature quickly reached more than 90 degrees. However, to my surprise, I wasn’t experiencing CPU throttling. kernel tasks process wasn’t hogging my CPU.
However, Cinebench doesn’t load GPU. I realised that the next logical step would be to find apply load to GPU.
I downloaded Valley UNIGINE benchmark. It is an equivalent of 3DMark. Unlike the latter, it runs on Macs. I wanted to see how my computer behaves under heavy 3D load. Once I launched the benchmark I have got exactly what I was expecting: Once the GPU heated up to 75 degrees C, kernel tasks hogged the CPU until the temperature dropped below 70 degrees. Then the throttling went away, the GPU heated up again, and the cycle repeated.
All the above lead me to the conclusion that the issue may be with my MacBook’s cooling system. In particular with the GPU’s cooling.
A friend pointed me at iStat Menus - a system monitor that can show a myriad of different stats such as readings of temperature sensors. And a MacBook has a lot of them.
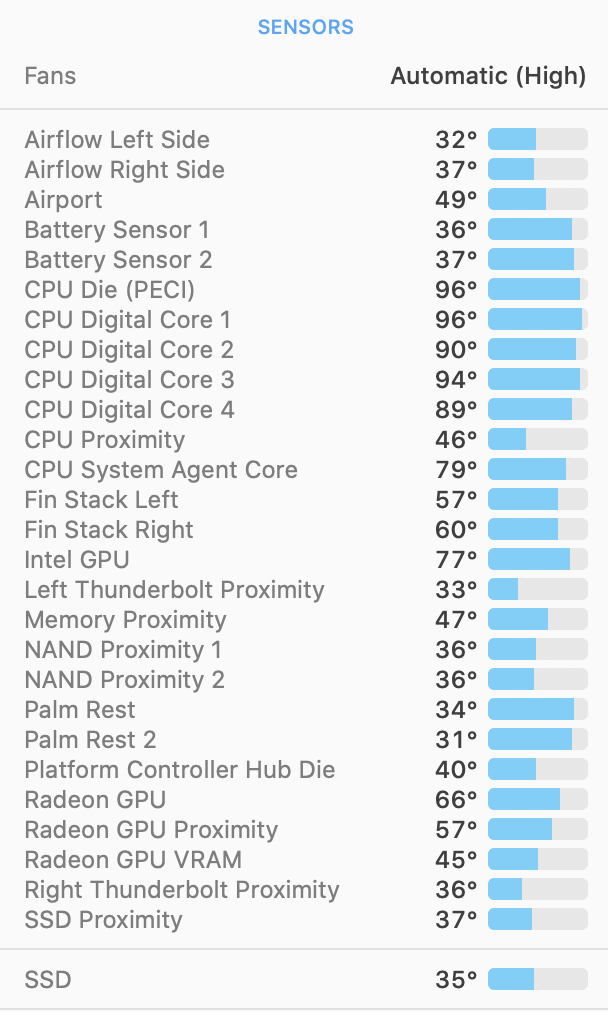
It also has a nifty feature - it can override speeds of cooling fans.
I cranked up the fan speeds and re-launched Valley benchmark. That time my GPU temperature stayed under 75 degrees and I didn’t experience any throttling. I bump up the quality settings to put an even higher load on the GPU. That did it - after a few minutes the GPU heated up and the throttling started.
So, what was wrong with My Mac’s cooling system?
I did some research and found a peculiar thing about MacBook Pro design. The CPU and GPU inside that are connected to the cooling fans by one same heat pipe:
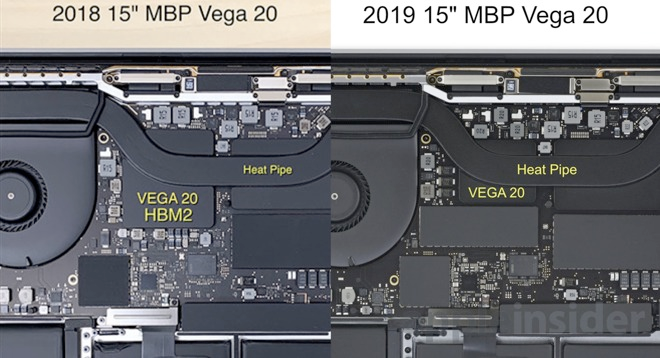
Image credit: Apple Insider
That means that the CPU and the GPU are heating each other. If one gets hot, the other one does too. That design has been present in all MacBooks since 2011 till at least 2019. Apparently has been causing GPU problems for ages.
There were a few recommended fixes.
For instance, to apply a piece of thermal pad between the CPU, GPU or heat pipe and the aluminium case. Indeed, since the MacBook’s case is metal it can serve as a large heatsink and effectively dissipate heat. That has a downside too. The downside of the laptop would quickly heat up potentially all the way up to 90 degrees C or more. Since I often worked with the laptop on my laps, that solution wasn’t ideal.
Luckily there are more ways to improve the cooling.
This Snazzy Labs' video suggests that the quality of the thermal paste Apple applies between the CPU, GPU and heat pipe isn’t good. And replacing it with something of better quality makes a difference even on a healthy laptop.
If I could take off the thermal pipe in my laptop and replace the thermal paste, possibly that would fix my throttling issue. Besides, quite likely that the cooling fans in my MacBook were clogged with dust. Cleaning them could make an improvement.
This Luke Miani’s video shows the process in details:
Since the logic board does not have to be taken off for that, I had a high degree of confidence that I could do that myself.
Inspired, I ordered the following parts:
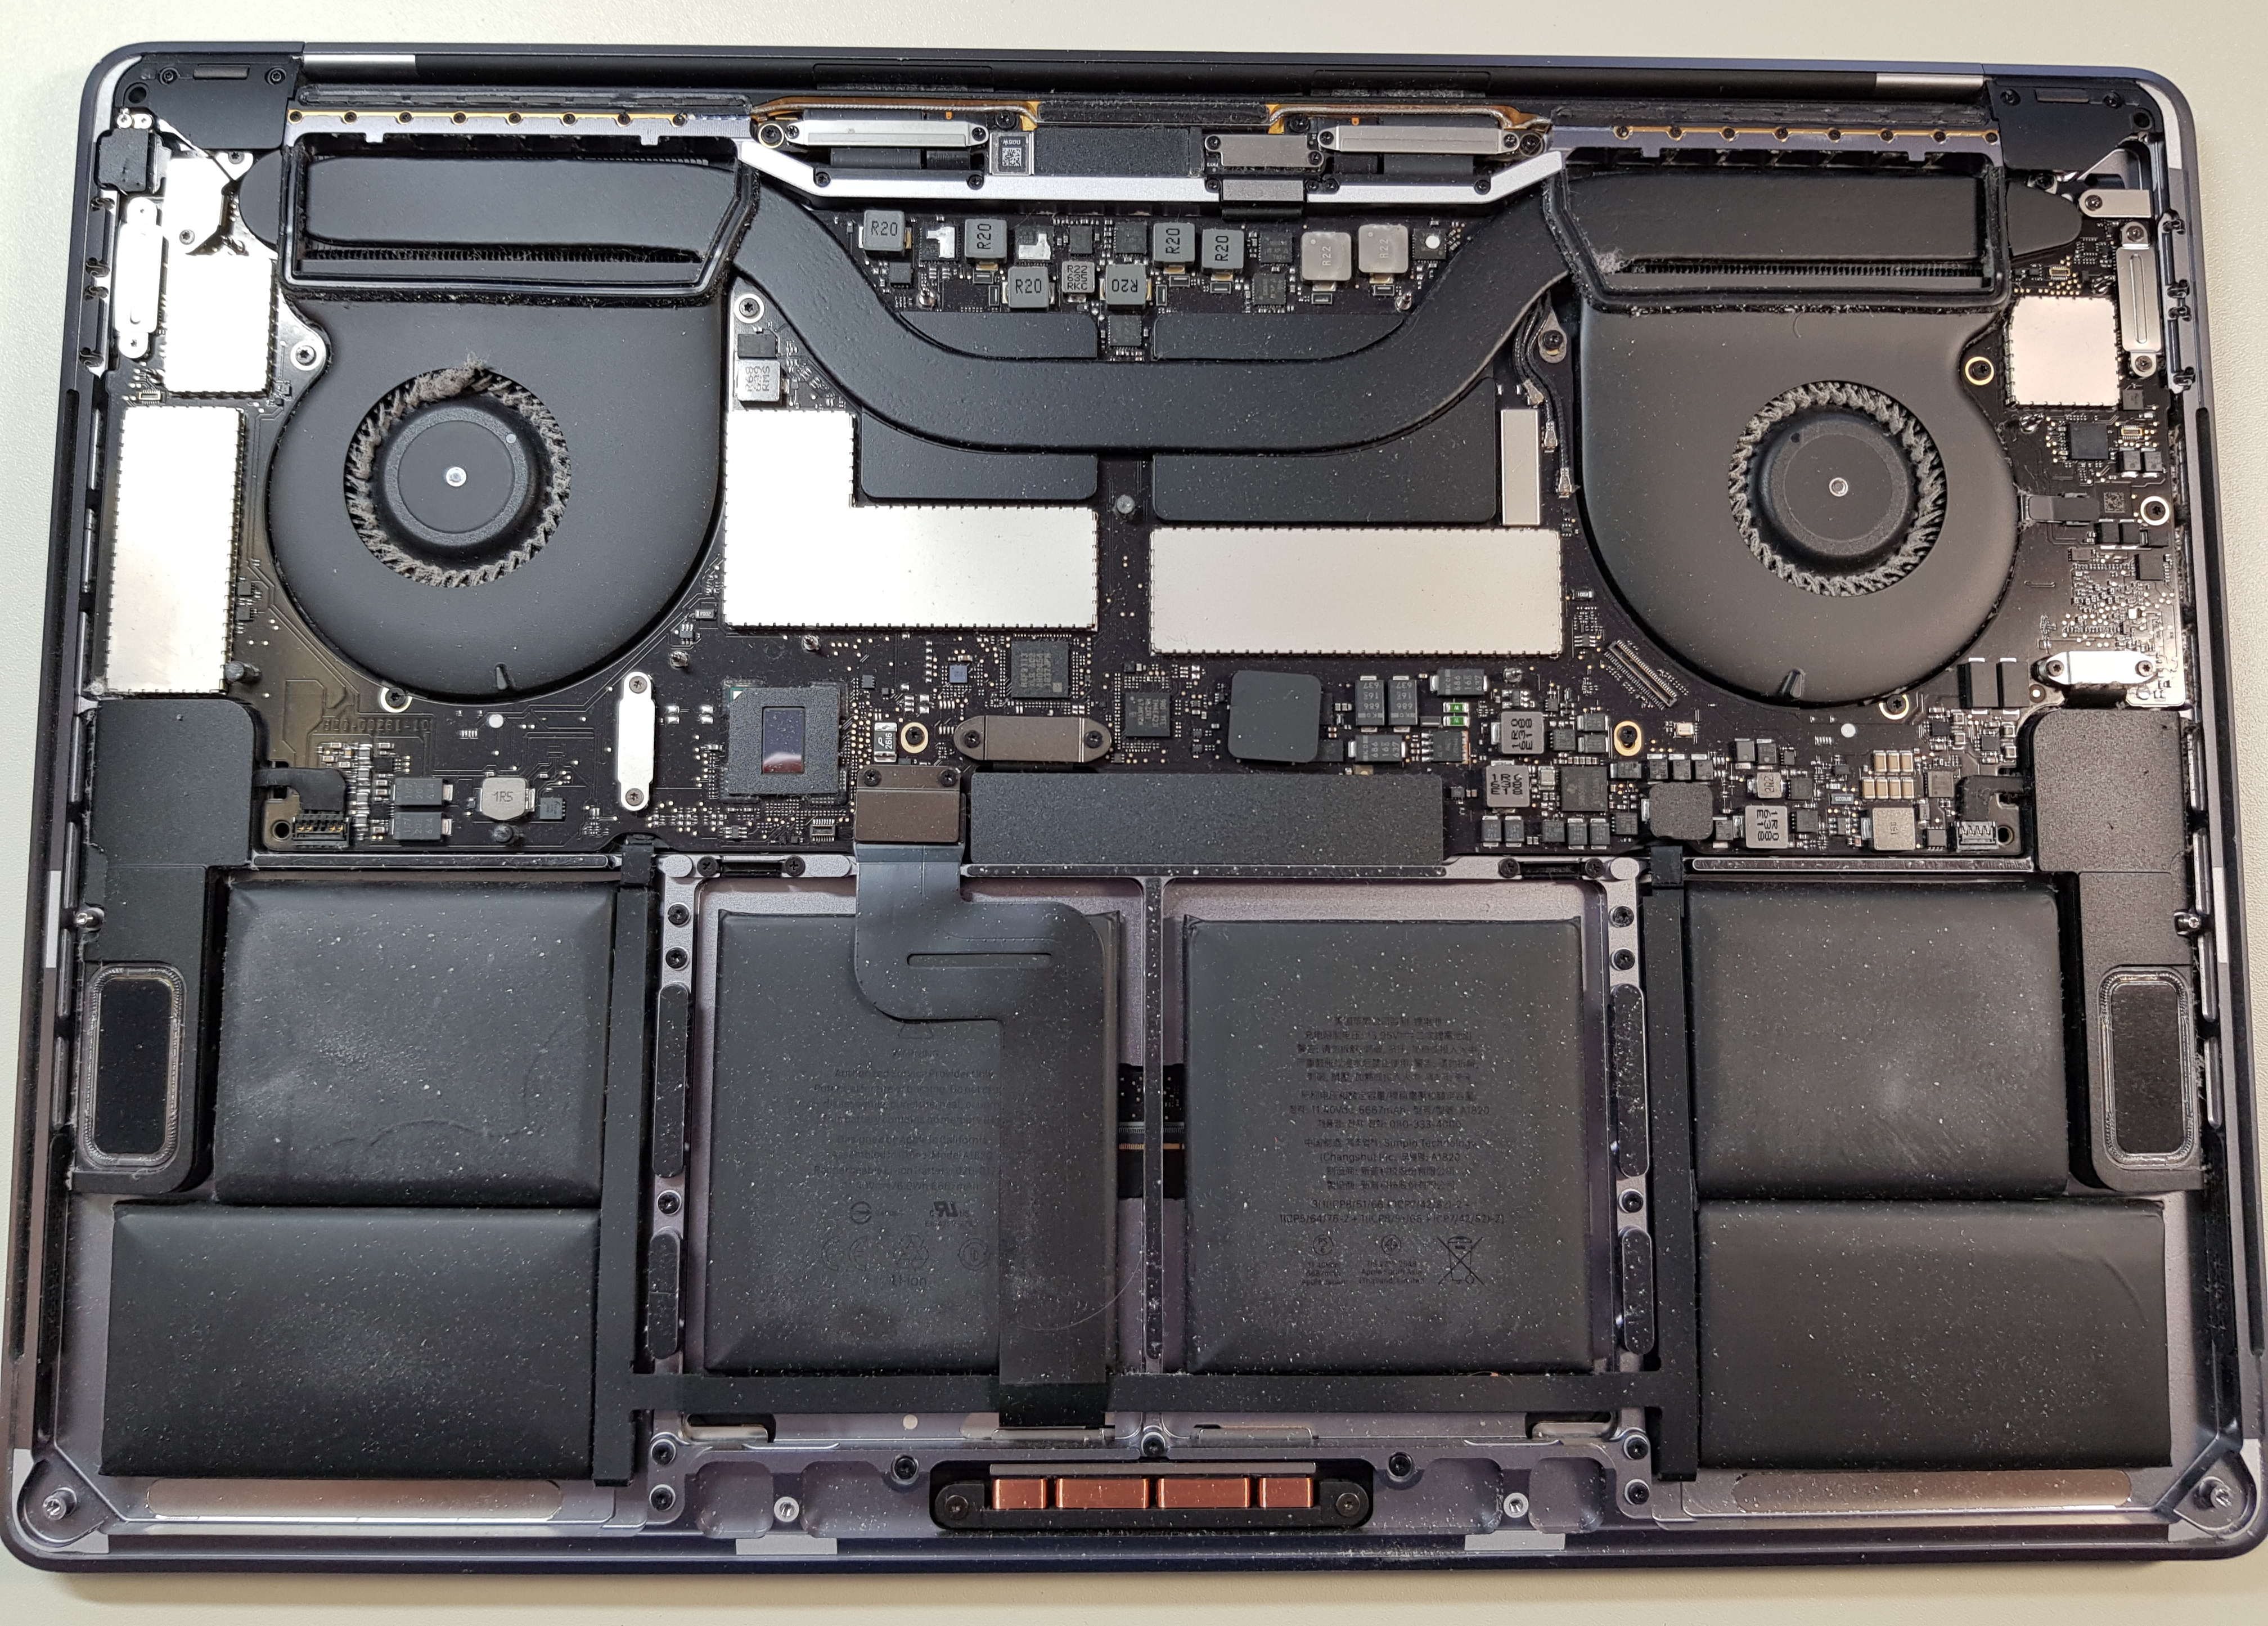
A few days later all the parts arrived. I prepared all the tools I needed for the the “surgery” and laid it out on my table.
The plan was to open it up, clean the cooling vents, then rip off the heat pipe and replace the old thermal grease with a new better one.
Opening the lid took some time. When I finally did, I saw that the cooling fans were all clogged by dust.
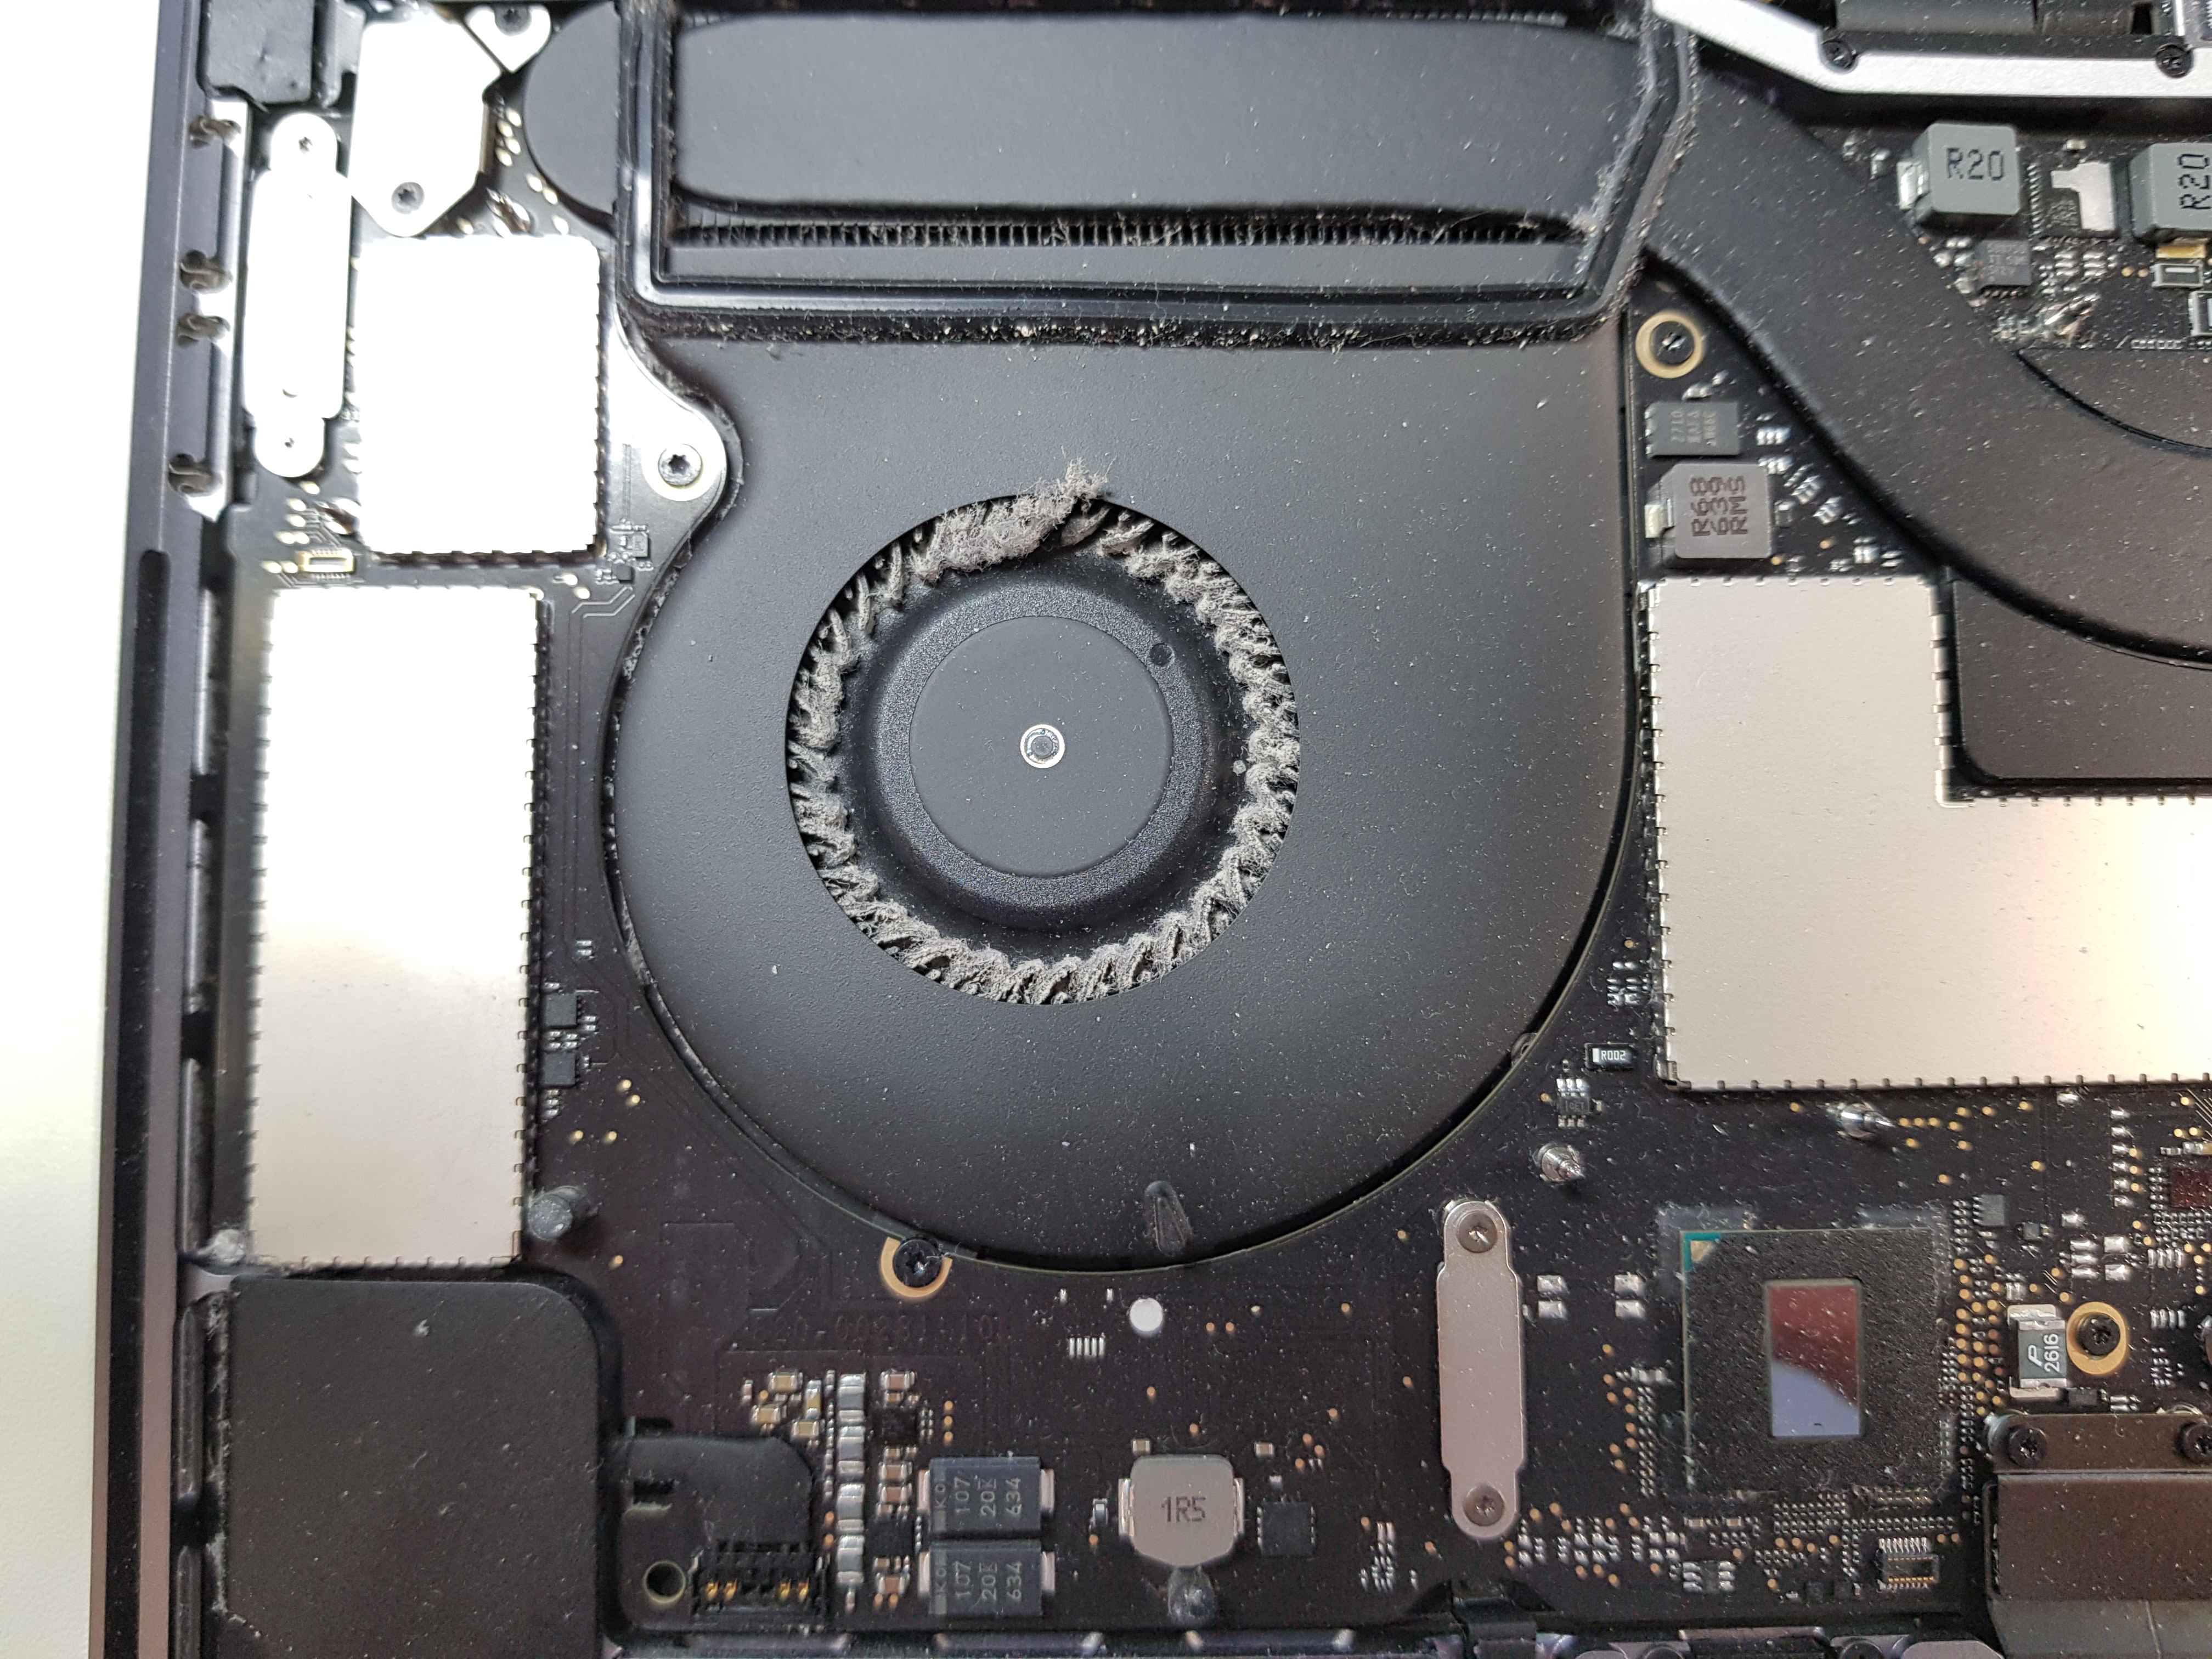
I cleaned the fans by blowing compressed air from a can at them and through vents on the back of the laptop.
However, taking the heat pipe off looked trickier than I anticipated. In the videos, I watched guys did it to a 2015 MacBook Pro. My MacBook was one generation up from them. And it looked like the layout of the cooling system changed a lot. I no longer had confidence that I could do that. I decided to try how my MacBook behaved with the vents cleaned. Maybe that was all I needed.
I closed the lid and moved onto testing.
I started Velocidrone and tried playing on the settings that previously made my MacBook choke. Everything was running smoothly. According to the temperature monitor’s reading, the temp of the Radeon chip was below 70 degrees all the time, while previously my system would start lagging when the temp raised over 75 degrees.
Only when I cranked the resolution and details settings all the way up I started to feel than CPU was throttling. But that was what I expected. Since a MacBook is not a gaming machine it was unfair to expect a top gaming performance from it.
Next, I started Unigine Valley 3D Benchmark. I cranked the performance preset all the way up to “Extreme” and kicked it off. To my surprise, my system wasn’t exhibiting any signs of throttling. It would slow down in the most challenging 3D scenes, but that was nothing like I experienced before.
So, here we are. In the end, the most simple fix of cleaning the cooling vents and fans of dust and dirt was enough to revive my MacBook Pro. Had I taken it to Apple, they would, without doubt, claimed that I needed a new logic board and charged me over a thousand dollars for it.