I work at Odecee. It is a technology consultancy company with a difference. They understand that people are their main and only asset, so they tend to hire smart IT professionals, pay them well, and give them cool toys.
Every week they run brown bags in their office. A “brown bag” means a lunchtime presentation where attendants are supposed to bring their lunches (in brown paper bags, hence “brown bag”). Yet, Odecee also provides catering for those events.
We have monthly sessions on web development, DevOps, mobile development, and “kitchen sink” (tech topics which don’t fit into any other category). However, employees are invited to speak on any other topics they are passionate about, whatever drives them, makes them tick.
I myself recently took an opportunity to present a brown bag on the basics of iOS music production. The reason I wanted to talk about music to a technical audience is because engineers often see the world through a lens of their technical skills. They like no one can benefit from a creative freedom music gives them. For engineers music, especially electronic music, is a perfect creative media. It is technical but, at the same time, it is unstructured. It obeys laws of physics but musicians don’t need to rely on formulas to create.
I hold a view that everyone can be a musician. Making music should be fun, the tools should be easily available and easy to use. Unfortunately, it is often perceived as something highly complex and expensive, only accessible to a few chosen ones. That point of view is reinforced by a current state of desktop music production tools. But fortunately for us, Apple delivered yet another mobile revolution and this one passed mostly unnoticed by the general public - the revolution in mobile music production. As with many other areas, iPhones and iPads made music making what it should be - easy, fun and accessible.
My goal with this presentation is, quite simply, change the world, one man at a time: if after that even one person picked up a music instrument, whether a real one or one in an iOS app, and made a tune then my job here is done.
It’s been nearly a year since I wrote that post: A new chapter. During that time I did a bit of traveling, spent a fair amount of time slacking off at the beach (you can’t resist that during summer time in Australia), but most of all I was studying. I was keen to deliver on my resolution to pick up lasting fundamental skills.
As I already had an experience with online education and found it as good, if not better, than in-person training, I went for online courses again. There is no shortage of opportunities for online learning for anyone who wants to pick up new skills, especially in technology: Coursera, Pluralsight, Udemy, Lynda.com, just to name a few, provide lots on online courses covering a wide variety of technologies. Most of them are very affordable or even free. I listened to a few lectures on Coursera.org before, however I never took them seriously. And just when I was deciding what to learn next, an email arrived into my mailbox advertising a brand new Full Stack Web Development Specialization. In Coursera’s lingo, a specialization is a sequence of related courses which progress you to a particular goal, in this case – becoming a full stack developer, i.e. a developer who is capable of creating both back-end and front-end sides of a software solution, in this instance in JavaScript. That specialization was advertised to include the following courses:
and an optional capstone project, where students could apply the newly acquired skills to build a real-world software product.
Although I already knew some of these topics, I decided to enroll for that specialization anyway. After all, reiterating the fundamentals never hurts. A part of my resolution was to acquire fundamental skills which do not depend on a single vendor. And the web is as fundamental as they get. The web is everywhere, it has become the application platform, and web frontend has become the front-end. I agree with Atwood’s Law, stating that “any application that can be written in JavaScript will eventually be written in JavaScript”. Over the years I’ve watched the meteoric rise of JavaScript from the sidelines wishing I could make a career turn and concentrate on that brave new world. Well, now I had a chance.
Before I’ve got stuck in the Oracle swamp, I used to build UI applications. That was what I did well and enjoyed doing. At those old times, UI meant C++ with MFC, Delphi, Visual Basic, or some similar old tools no one can recall now. And since I decided to take a career turn, I wanted to get back to UI. But since UI now universally means web applications, I had to become an expert in web development. I took a plunge and enrolled for the Coursera’s specialization.
The next few months were intense. At first I thought I could learn at a leisurely pace at Coursera, and if I’m bored I’ll pick up some other courses to do at the same time. But instead, I found that Coursera’s stuff was full-on. I had to watch the lectures, read a lot of supplementary materials, do assignments and turn them in each week. And because I wanted to obtain an in-depth understanding of how everything worked, I was studying nearly full time. Then I had to verify other people’s assignments – Coursera has a peer-to-peer assessment model, where each student has to grade assignments of 3 other students each week. That is clever, and I found that I learned as much from other student’s fork as from my own study.
In the middle of the second course I was doing, Coursera suddenly changed its business model. It used to be all free for everyone. Now anyone who wanted to get assessed and graded had to pay. I still could watch all the lectures for free, but my assignments wouldn’t be graded and I wouldn’t get the course completion certificate. After some consideration I chose to pay – it wasn’t that much anyway.
To cut a long story short, that was quite a ride. Now when it is all behind me, I wholeheartedly recommend that specialization to anyone willing to learn about web development. You may take all of its courses to learn everything you need to know to become front-end or back-end web developer, or pick individual courses to suit your learning needs. Either way, it is an excellent value for your time and your money.
In a few days after I finished the last course and updated my resume, I had a new job as a front-end web developer. It is a new direction for me, a new road ahead. I like it, I think I’ll stay on it for a while.
I’ve been windsurfing a few years but I didn’t have my own board. Whenever I wanted to go for a ride, I rented a board from SHQ at Sandringham beach. That was Ok, and I had a lot of fun, but I was confined to a single location. Besides, SHQ only has beginners’ large boards and small sails available for rent, and after some time riding on them started to feel dull.
Therefore, I recently succumbed and bought a second hand board, complete with a mast and a few sails. Now, when I have my own board, I can ride anywhere at any time, and rig whichever sail suits me best. But owning my own board also adds hassle of transporting it, storing, rigging and unrigging.
But probably the most frustrating experience a windsurfer can have is a stuck mast. A modern windsurfing masts are made of glass fiber or carbon fiber and consist of 2 parts: top and bottom, connected together with a ferrule. The parts fit together very tight, and if even a little sand gets into the ferrule, then the mast can become “stuck”, and it will be virtually impossible to separate by hand.
That problem is very common, and Google suggests lots of different solutions: playing a team tug of war with the mast, twisting the two parts in opposite directions using booms as levers, pouncing on the middle point on the mast to flex it to grind the sand, filling it with pressurized water, or even pulling the mast apart with a truck. Unfortunately, the first time it happened to me I was on my own with nobody to help, I didn’t own a truck. So, I came up with my own innovative solution.
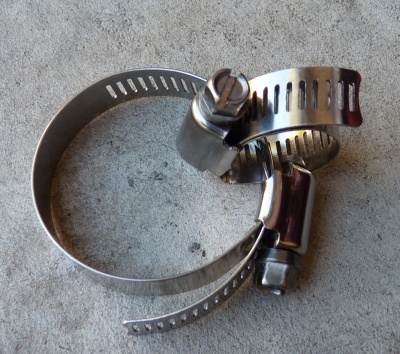
I got 4 hose clamps from Bunnings: two 33-57mm to fit around the mast and two 17-32mm. I’ve put the smaller clamps around the side of each of the larger ones.
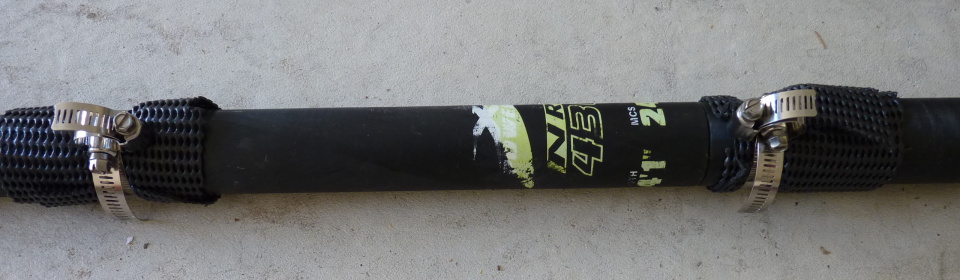
Then put the large clamps on the mast to each side of the joint point with rubber mats as a padding between the clamps and the mast. I left enough space between the clamps because I didn’t want to clamp down on the ferrule joint itself. Then tightened the clamps as much as I could.
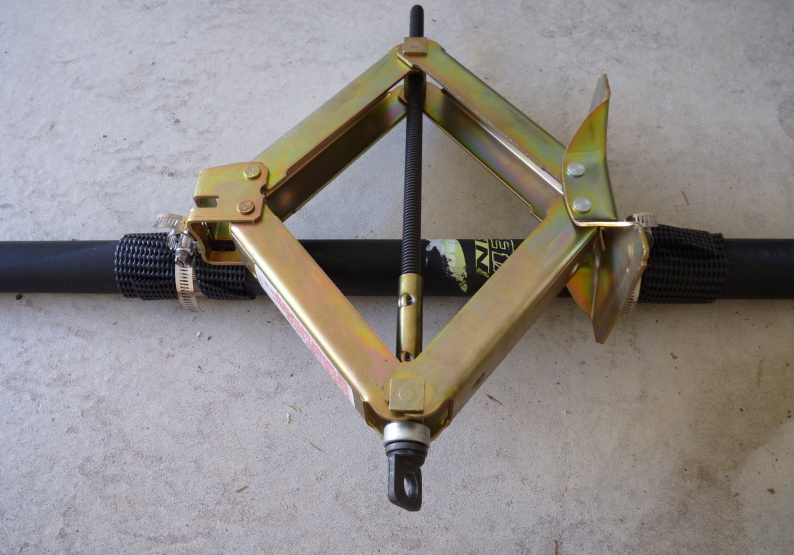
Then I stuck the car jack between the clamps and slowly started jacking up. The smaller clamps' rings provide support for the jack.
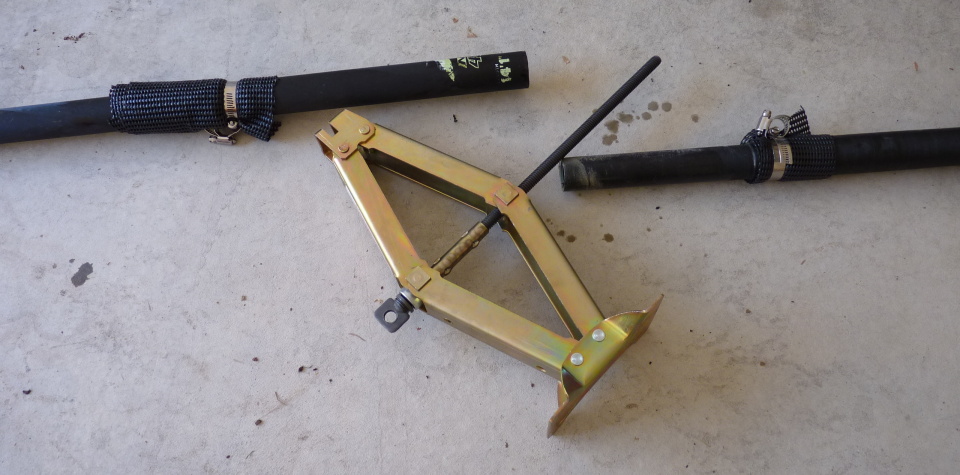
After a while I heard a cracking noise but no effect. I released the jack, loosened the clamps and rotated them on the other side of the mast. Then I jacked up again. After a few minutes of that the mast finally started to come apart, and I finally had it in 2 pieces again!